 English
 Deutsch
 Slovensky
 Česky
ČeskyHow to Transfer Photos to Your Computer
To work with new photos in Zoner Studio, the first step is to transfer them to your computer. This article provides the procedure along with an overview of functions and settings related to this process.
Correctly Setting the Source and Target
Connecting to the Computer
The first step is to connect your camera or mobile phone to your computer. Typically, you can either connect the device via a USB cable or remove the SD memory card and insert it into your computer.
If your computer does not have an SD card slot, you can use a memory card reader.
Some devices also support connection via Bluetooth or Wi-Fi.
Once successfully connected, the camera’s or mobile phone’s storage will appear on your computer as a separate drive.
Starting the Import

Where to find the function:
Left panel Navigator | bottom section
Manager module | top menu | Get section
While you can transfer photos to your computer using Windows Explorer or other programs, the Import function in Zoner Studio offers features that make the transfer easier and improve subsequent photo management.
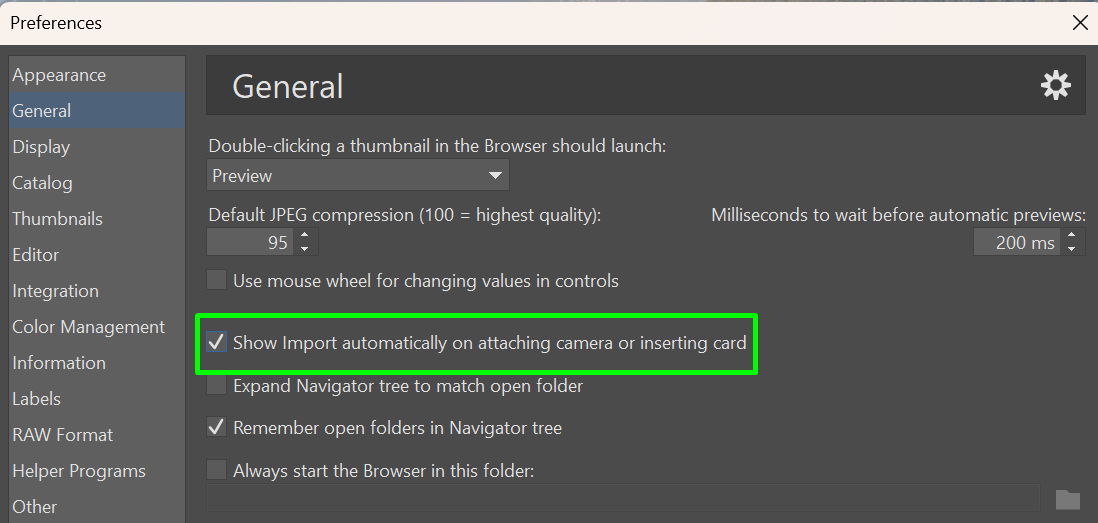
You can start the Import as soon as your device is connected to the computer. You can also set it so that the Import window opens automatically when the device is connected. This option can be found in two places:
- In Preferences (Ctrl+M) | General, the option Launch Import module when device is turned on or card is inserted
-
In the Import window, Source section, the option Open Import when device is turned on or card is inserted

For the Import to launch upon device connection, Zoner Studio must be running at that time.
Correctly Setting the Source and Target
During the actual import, the most important step is to correctly set the Source and Target. If you open the Import manually, the Source will be set to the last used path. When Import opens automatically, the Source will also be set automatically to the drive of the connected device.

If you need to adjust the path, click the Browse icon next to the path field, and don’t forget the Include subfolders option – this is useful if the content on the connected device is split across multiple folders and you want to import from all of them at once.
If your Source is set correctly but not all expected files are displayed, check the Filter view option at the bottom of the Import window. Make sure all required file formats are selected.
When entering the Destination, you can also use the Create subfolders option, which helps streamline file organization. The field under Create subfolders is used to enter the name of the created subfolder(s).
If you enter plain text (e.g., “Trip to New York”), only one subfolder will be created and all selected files will be moved into it. You can also enter formatting strings, which not only influence the subfolder names but also determine how files are sorted.
Formatting Strings
By default, the field contains the string {Y}-{M}-{D} , which sorts the files into subfolders according to the date taken and names them in the format YYYY-MM-DD. The string can be modified, for example by changing the symbols between the elements of the string, changing their order, and adding more text after the string. Clicking the arrow next to the field displays a list of other possible formatting elements, which can be used to sort files, for example, by author, extension, or import time.
You can also insert a backslash between the elements of the string. This makes it possible to create a more complex folder structure with multiple levels of nesting.
For example, if you change the default formatting string {Y}-{M}-{D} to {Y}\{M}\{D} , it means that a year folder will be created, containing folders with month numbers, and these will in turn contain folders with day numbers.
The resulting structure with names is displayed below in the Preview field. It is also possible here to uncheck some folders to select that the given files will not be imported and the folders will not be created.
Other Import Options
In addition to the useful ability to create a clear folder structure, Import offers other options that streamline work. The Create second copy function is useful, for example, when backing up files, so that you can transfer files to two different locations at the same time, such as to the computer and to an external drive. Simply select the second destination and the files, including the created folder structure, will be transferred smoothly to both storage locations in the course of a single import.
Another useful option is the automatic assignment of metadata to imported files. In the Automatically assign information section, simply enter what metadata should be inserted, and this way you can easily sign or name your files, or ensure that they can be easily found in the future thanks to keywords.
It can also be useful to be able to rename files in bulk during import. This function again uses formatting strings, which allow you to set, for example, that the time taken is inserted into the file name. You can also arrange for only part of the file name to be replaced instead of the entire name.

A photo filename often contains an identifier such as “DSC,” “IMG,” or “DSF” followed by a number. If you want to remove the identifier but keep the number, enter e.g. “IMG” in the Find field and leave the Replace field empty. Imported files will then only have the number as their name.
Some users prefer to copy rather than move files to the destination during import. In such cases, the connected device may still contain files that were imported previously. The Import dialog can detect this, so you don’t have to remember. Simply check Import only new images.
More Information
The Import function does not download files into Zoner Studio, but rather moves or copies them to your computer. Files cannot be stored in Zoner Studio – the program is not a storage solution, but processes files stored on your computer, connected drives, or cloud services.